Old Fashioned Egg Dyeing – Family Fun Project
Old Fashioned Egg Dyeing – Family Fun Project
Old family traditions are being revived, making the old ways New Ways again and one of them is Old Fashioned Egg Dyeing. I have sentimental memories of dyeing eggs naturally with my Nanny, sisters and cousins.
As a kid in the 50’s it was exciting to be a part of collecting natural ingredients from Nanny’s spice cupboard and Grandpap’s garden to create those marvelous natural colored Easter eggs.
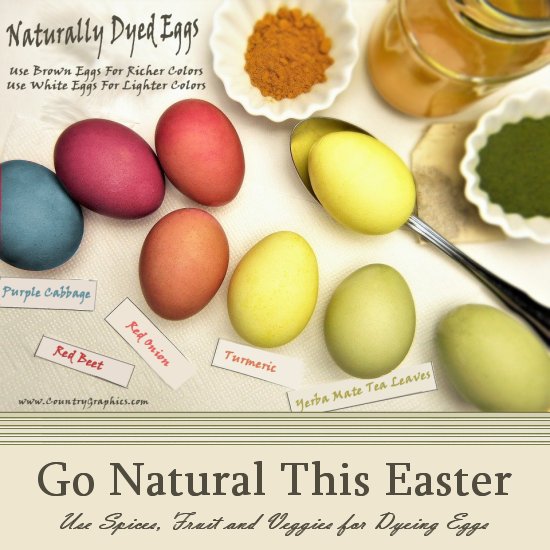
Wow! Who would of thought that red and yellow onions skins, beets and beet tops, teas, and spices could create such magic. The one natural ingredient that amazed us a kids was, how could it be possible for red (now called purple) cabbage to make such lovely blue eggs?
Take the time and create an Old Fashioned Egg Dyeing experience with your family. I suggest that you hard boil the eggs a day or two before you attempt this project.
Happy Easter to you all!
What you will need for Old Fashioned Egg Dyeing:
- Hard-boiled eggs.
- Newspaper, Towels, or Paper towels.
- Bowl or cup deep enough to completely submerge an egg or eggs.
- Tongs, egg dipper, or slotted spoon.
- A variety of natural dyeing agents, chosen from the list below or create your own.
- Sauce Pans for each natural dye color.
- White Vinegar for adding to strained dye color.
- Plain cooking oil or spray oil.
Creating the Dyeing Baths:
Add one to two cups of water per each natural ingredient in the list below and boil till preferred color intensity is reached.
- Purple Cabbage chopped 1 cup — makes blue on white eggs, green on brown eggs
- Beets shredded 1 cup — makes pink on white eggs, maroon on brown eggs
- Red Onion Skins 1 cup — makes lavender white eggs or red on brown eggs
- Yellow Onion Skins 1 cup — makes orange on white eggs, rusty red on brown eggs
- Red Zinger Tea 1 bag — makes lavender on white eggs
- Yerba Mate Tea Leaves 2 tablespoons — makes soft green on white eggs
- Ground Turmeric 2 tablespoons — makes yellow on white eggs
Strain the dye into it’s own bowl or cup and add 1 tablespoon white vinegar to every cup of strained dye liquid. Let dye bath cool to prevent little fingers from getting burnt. You can now begin to dye your Easter Eggs the Old Fashioned Way.
Use a slotted spoon to add and remove eggs from the dye baths, when desired color is reached move egg from dye bath to a paper towel to dry. After eggs are dry you can give them a shine by polishing them with vegetable oil.
Easter Egg Dyeing TIPS:
- Older eggs are better for hard boiling, the egg shells release easier.
- Peeling the eggs: Crack the egg’s shell and use a spoon to help release the outer shell.
- For every dozen eggs, plan on using at least 4 cups of dye liquid.
- Adding vinegar starts to break down the egg shell, allowing the color to permeate and bond more quickly to the shell. (More vinegar then suggested is NOT advised)
- Leaving eggs in the dye bath and refrigerating them overnight intensives the eggs color.
- Only use editable natural ingredients when making your Easter egg dyes.
How do you color eggs for Easter? Leave a comment or send us an email with permission to post your ideas.